You noticed a water stain on your ceiling — or worse, an active drip. Your first instinct is to go straight to the roof and start looking. Stop. Finding a roof leak isn't as simple as walking up there and looking for a hole. Water is deceptive: it enters at one point, travels along rafters, pools in valleys, and drips down somewhere entirely different. The stain on your ceiling might be 8 feet away from where the leak actually is.
This guide walks you through the systematic process professional roofers use to locate leaks — adapted for homeowners who want to find the source safely, accurately, and without spending money on a professional inspection they don't need yet. By the end, you'll know exactly how to find a roof leak, what tools you need, where leaks most commonly hide, and when it's time to stop DIYing and call a contractor.
Table of Contents
- Why Finding a Roof Leak Is Harder Than It Looks
- Tools You Need
- Step 1: Start Inside — Attic Inspection
- Step 2: Trace the Water Path Uphill
- Step 3: Exterior Roof Inspection
- Step 4: The Water Test Method
- Common Roof Leak Locations
- Interior Signs That Help Narrow the Search
- When to Call a Professional
- Frequently Asked Questions
Why Finding a Roof Leak Is Harder Than It Looks
Water doesn't fall straight down once it gets through your roof. It follows the path of least resistance — flowing along a rafter, pooling against a joist, soaking into insulation, and eventually dripping onto your ceiling drywall at a completely different location. This is why homeowners often assume the leak is directly above the stain, tear out that section of drywall, find nothing, and are completely baffled.
The gap between where water enters the roof and where it shows up inside can be anywhere from a few inches to 10 feet or more. On steep-pitch roofs, water can travel several feet horizontally before finding an exit point. This is the fundamental challenge of roof leak detection — and it's why a methodical, inside-out approach beats random roof walking every time.
According to the National Roofing Contractors Association (NRCA), the vast majority of residential roof leaks originate at penetrations — chimneys, vents, skylights, and pipe boots — not in the flat field of the shingle surface itself. That's the most important fact to internalize before you start looking.
Tools You Need
You don't need specialized equipment to find most roof leaks. Here's what you'll want on hand:
A few notes on safety: never go on a roof during rain or wet conditions. Wet shingles are dangerously slippery. Wear shoes with rubber soles, not sneakers with smooth bottoms. If your roof pitch exceeds 6:12 (more than 6 inches of rise per foot of run), consider staying off it entirely and using the water test from ground level with a ladder only at the eaves.
Step 1: Start Inside — Attic Inspection
The attic is where most leak investigations should begin, not the roof. When it's actively raining — or within an hour after a rain event — grab your flashlight and get into the attic. You're looking for several things:
- Active dripping: The holy grail. Follow the drip straight up to where it's hitting the decking.
- Water stains on rafters or decking: Dark brown or black streaks running along the wood grain. These indicate where water has been traveling.
- Wet or matted insulation: Wet insulation is much darker than dry insulation and may have a musty smell. Press on it — if it compresses wetly, water is present.
- Mold or mildew growth: Black, green, or white fuzzy growth on rafters or decking means moisture has been present long enough to allow biological growth — weeks at minimum.
- Daylight: Turn off your flashlight and wait for your eyes to adjust. Any points of daylight coming through the decking indicate a gap, though small holes don't always leak depending on how the water flows.
Once you find any of these signs, mark the location. Chalk on the rafter, tape on the decking — anything that helps you identify the spot later when you're on the roof.
⚠️ Important: What you find in the attic is likely not the leak source — it's where the water arrives inside. The actual entry point is almost always higher on the roof. Read the next step carefully before assuming you've found the source.
Step 2: Trace the Water Path Uphill
This is the step most DIYers skip, and it's why they end up confused. Once you've located the wet spot in the attic, don't go straight to the roof above it. Instead, follow the water trail uphill — tracing the stains along the rafters toward the ridge.
Water running down a rafter will leave a trail. Follow that trail up as far as it goes. Where it originates — whether that's a rafter intersection, a penetration point, or a spot where the decking boards meet — that's your suspect zone.
Once you've identified the suspect zone from inside, measure the distance from the nearest exterior wall or a roof penetration you can see (like a plumbing vent stack or chimney). Write it down: "12 feet from the north wall, 3 feet left of the vent pipe." You'll use this measurement to find the same spot from the roof surface.
Step 3: Exterior Roof Inspection
Now go outside. Before climbing anything, do a ground-level visual scan with binoculars. You're looking for:
- Missing, cracked, or curled shingles — especially in the suspect zone you identified from the attic
- Lifted flashing around the chimney, skylights, or roof valleys
- Cracked or split pipe boot seals (the rubber collar around plumbing vent pipes)
- Debris buildup in valleys — leaves, moss, or granule accumulation that can dam water
- Sagging or wavy sections — these indicate decking damage beneath
If you're comfortable doing so, set up your ladder and get a closer look at the suspect zone. You don't need to walk the entire roof — focus on the area you've already narrowed down plus all nearby penetrations and transitions.
Examine each of these closely:
- Run your hand under flashing edges — if you can lift them, they're not sealed
- Check pipe boot gaskets for cracks. A cracked EPDM rubber boot is one of the most common leak sources in any home over 10 years old
- Look at the sealant around any roof penetration — cracked, dried, or missing sealant is an immediate suspect
- Press on shingles near valleys — soft spots indicate wet, rotted decking beneath
Take photos of anything suspicious. Good documentation helps if you eventually file an insurance claim for storm damage or get professional repair estimates.
Step 4: The Water Test Method
If you can't find the leak source visually — a frustratingly common situation — the water test is your next move. This method requires two people: one on the roof with a garden hose, one in the attic watching.
How to Run a Roof Water Test
- Position your helper in the attic with a flashlight and good communication (phone call works well).
- Start low on the roof — begin just above the eaves, below the suspect zone.
- Soak one section at a time — saturate a 3–4 foot section for 2–3 minutes before moving. Don't rush. Water needs time to travel into the attic.
- Move upward slowly — after each section, ask your helper if they see anything. Move up a few feet and repeat.
- When your helper calls out water — stop and mark that section. The leak entry point is somewhere in the last zone you saturated.
- Narrow it further — repeat the process in smaller sections within the identified zone.
This process takes time — budget 30–90 minutes for a methodical water test on a typical home. Rushing it by soaking too large an area at once defeats the purpose. The goal is to isolate the exact entry zone, not just confirm water is getting in.
One important note: the water test will not work if your attic has a vapor barrier that hides water movement, or if the leak only occurs under wind-driven rain. Those situations require professional diagnosis.
Common Roof Leak Locations
Knowing where leaks most commonly hide will help you prioritize your inspection. Here are the high-probability zones on any residential roof:
1. Pipe Boots and Vent Flashings
The rubber gasket (boot) around plumbing vent pipes is one of the highest-failure components on any roof. EPDM rubber boots typically last 10–15 years — far less than the shingles around them. When the boot cracks, splits, or separates from the pipe, water runs straight down into the attic every time it rains. Inspect every pipe boot on your roof. A cracked boot is almost always the source when you find a leak directly below a vent.
2. Chimney Flashing
Chimney leaks are the classic "I've been chasing this leak for years" problem. Water can enter through: the cap flashing (the metal that overlaps the step flashing), the step flashing itself (the L-shaped metal pieces along the chimney sides), the counter flashing (embedded in the mortar joints), or the chimney crown and cap. Any one of these can fail independently, and they often fail together on older homes. Inspect all four zones carefully.
3. Valley Seams
Roof valleys — the V-shaped channels where two roof planes meet — carry enormous volumes of water. Open valleys (exposed metal flashing) and closed valleys (shingles cut over the valley) both develop leaks over time as flashing corrodes or shingles degrade. Granule loss in valleys accelerates shingle wear. A valley leak will typically show up as a stain running along the ceiling toward the interior corner of the room below.
4. Skylights
Skylight leaks fall into two categories: the skylight itself (failed glazing seal) or the flashing around it (more common). A condensation drip from a skylight is sometimes mistaken for a leak — actual leaks will produce water even when temperatures are above the dew point. Inspect the curb (raised frame), the saddle (the flashing at the uphill edge), and all four sides of the step flashing.
5. Roof Edges, Eaves, and Fascia
Leaks at the roof edge are often caused by ice dams (in colder climates), inadequate drip edge installation, or clogged gutters allowing water to back up under the shingles. If your leak only happens during freezing rain or the first warm days after a snowfall, ice damming is the likely culprit. Proper ventilation and adequate attic insulation are the long-term solutions.
6. Exposed Nail Heads and Improper Flashing Repairs
Exposed roofing nails — either from improper installation or from nails backing out over time — create direct water pathways into the decking. Similarly, amateur repairs involving caulk over shingles (rather than proper flashing replacement) tend to crack and fail within 1–3 seasons. If you see large blobs of roofing caulk anywhere on your roof, that's a previous repair attempt that may now be failing.
7. Worn or Damaged Shingles in the Field
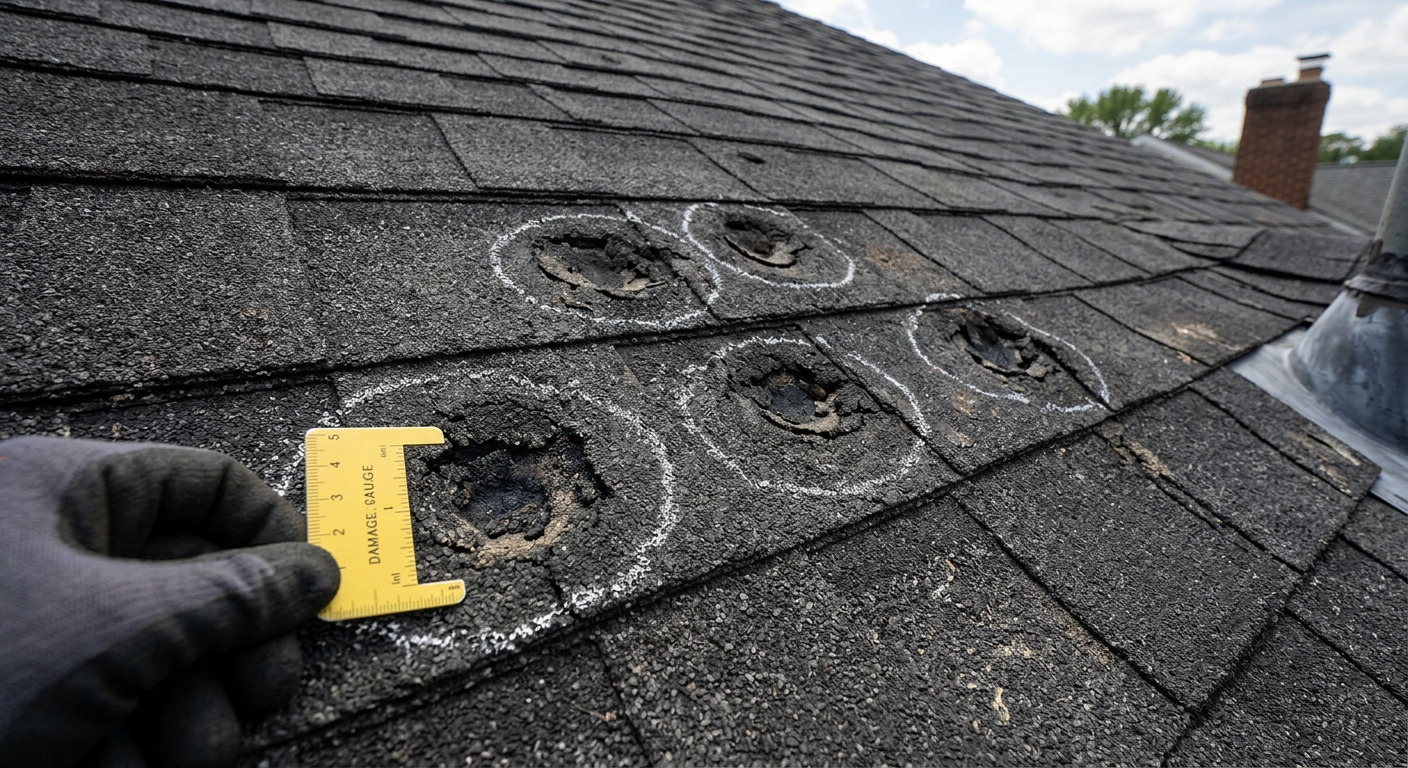
While penetrations cause most leaks, severely worn shingles — those with significant granule loss, cracking, or missing sections — can allow water penetration in the open field. Hail damage often creates micro-fractures that don't leak immediately but degrade over one to three subsequent seasons. Homes in hail-prone regions should have roofs inspected after any hail event exceeding 1-inch diameter.
Interior Signs That Help Narrow the Search
The appearance of water damage inside your home carries clues about where the leak is coming from. Here's how to read the signs:
- Single circular ceiling stain, center of room: Often points to a pipe boot or vent flashing directly above. Check all plumbing vents in that area.
- Stain along an interior wall or near a corner: Usually indicates a valley leak or a chimney issue. Water ran down a rafter to the wall intersection.
- Stain along an exterior wall: Could be roof edge, fascia, or improper flashing at the rake edge. Also consider window flashing issues — not every wall leak is a roof leak.
- Stain that only appears in winter or after freezing temperatures: Ice damming is the primary suspect. The roof itself may be intact but the eave ventilation is inadequate.
- Stain directly below a skylight: Could be condensation (not a leak) or skylight flashing failure. Touch the stain — if it's dry but the skylight drips on cold mornings, it's condensation.
- Multiple stains in different rooms: Either multiple separate leak sources, or a single large leak with water spreading along multiple joists. Start with the largest stain and trace it back through the attic.
When to Call a Professional
DIY leak detection has real limits. Know when to stop and get professional help:
- You can't safely access the roof. Any pitch over 6:12 on a wet or frost-covered surface is a fall risk. No leak is worth an ER trip.
- The water test doesn't produce results. Some leaks only occur during wind-driven rain at specific angles — conditions impossible to replicate with a garden hose.
- You find mold in the attic. Mold indicates the leak has been ongoing long enough to require remediation, not just repair. A professional assessment will scope the full damage.
- You suspect structural damage. Soft spots, sagging sections, or spongy decking under foot indicate rot. This is beyond DIY territory.
- Your home is over 15 years old and you can't identify the source. Older homes often have compounding issues — multiple small failures contributing to a single leak. Professional thermal imaging or moisture mapping can identify sources that aren't visible to the naked eye.
- You've made a repair and it still leaks. Chasing the same leak through multiple repair attempts is a sign that either the source hasn't been correctly identified, or there are multiple entry points.
A professional roof inspection typically costs $150–$400 and will identify all sources, prioritize repairs, and document condition for insurance purposes. If your home has had storm activity recently, many contractors will inspect for free if there's a reasonable possibility of storm-related damage.
When you do reach out to a contractor, having your attic documentation, photos, and notes from the water test makes the inspection more efficient and helps ensure the contractor focuses on the right areas rather than starting from scratch.
Once the leak source is confirmed — whether you find it yourself or a pro does — timely roof repair is critical. Every week a leak goes unaddressed, the water damage compounds: decking rots, insulation loses R-value, and mold spreads. The repair cost is almost always a fraction of what water damage remediation runs if the leak is allowed to continue for months.
Quick Summary: How to Find a Roof Leak in 4 Steps
- Attic inspection first. Go inside with a flashlight during or after rain. Find wet spots, stains, or drips.
- Trace uphill. Follow water stains along rafters toward the ridge to find the likely entry zone.
- Exterior visual inspection. From the ground with binoculars, then a ladder for close-up. Focus on all penetrations — pipe boots, flashing, skylights, chimneys.
- Water test if needed. Two people, garden hose, work from low to high in small sections. Narrow down the exact zone.
Systematic beats fast every time. Fifteen minutes of attic inspection will save you hours of aimless roof walking — and it keeps you safer too.
Frequently Asked Questions
Why does my ceiling leak only when it rains hard?
Light rain may not generate enough water pressure or volume to push through a small breach. Heavy rain forces water into gaps that normally stay dry. This usually points to flashing failure, a cracked vent boot, or a compromised valley — all common sources that get worse over time. Don't wait for the next storm; repair it now while the weather is dry.
How do I find a roof leak from the inside?
Go into your attic during or after rain with a flashlight. Look for water dripping, wet insulation, water stains on rafters, mold or mildew growth, and daylight shining through the decking. The wet area on the roof deck is usually directly above where you see the stain, but the actual entry point may be several feet uphill. Trace the stain along the rafters toward the ridge to find where it originates.
Can I find a roof leak without going on the roof?
Yes — start with an attic inspection and a ground-level visual scan using binoculars. You can identify many leak sources (missing shingles, obvious damage, lifted flashing) without climbing up. If you cannot identify the source safely from the ground or attic, a professional inspection is the safer and smarter choice. Don't risk a fall to save $200 on an inspection.
How long can a roof leak go undetected?
Weeks or months. A slow leak may saturate insulation before any visible ceiling stain appears. By the time you see a drip, mold may already be growing in the attic. Regular attic checks after heavy rain events — even just a 5-minute flashlight scan — can catch leaks early before structural damage or mold remediation becomes necessary.
What is the most common cause of roof leaks?
Flashing failure is the single most common cause of residential roof leaks, accounting for a significant majority of cases. Flashing is the thin metal that seals roof penetrations — chimneys, vents, skylights, and valleys. It corrodes, separates, or was improperly installed to begin with. The second most common cause is failed pipe boot seals around plumbing vents. Together, these two failure modes account for the majority of leaks on any roof older than 10 years.
Does homeowners insurance cover roof leaks?
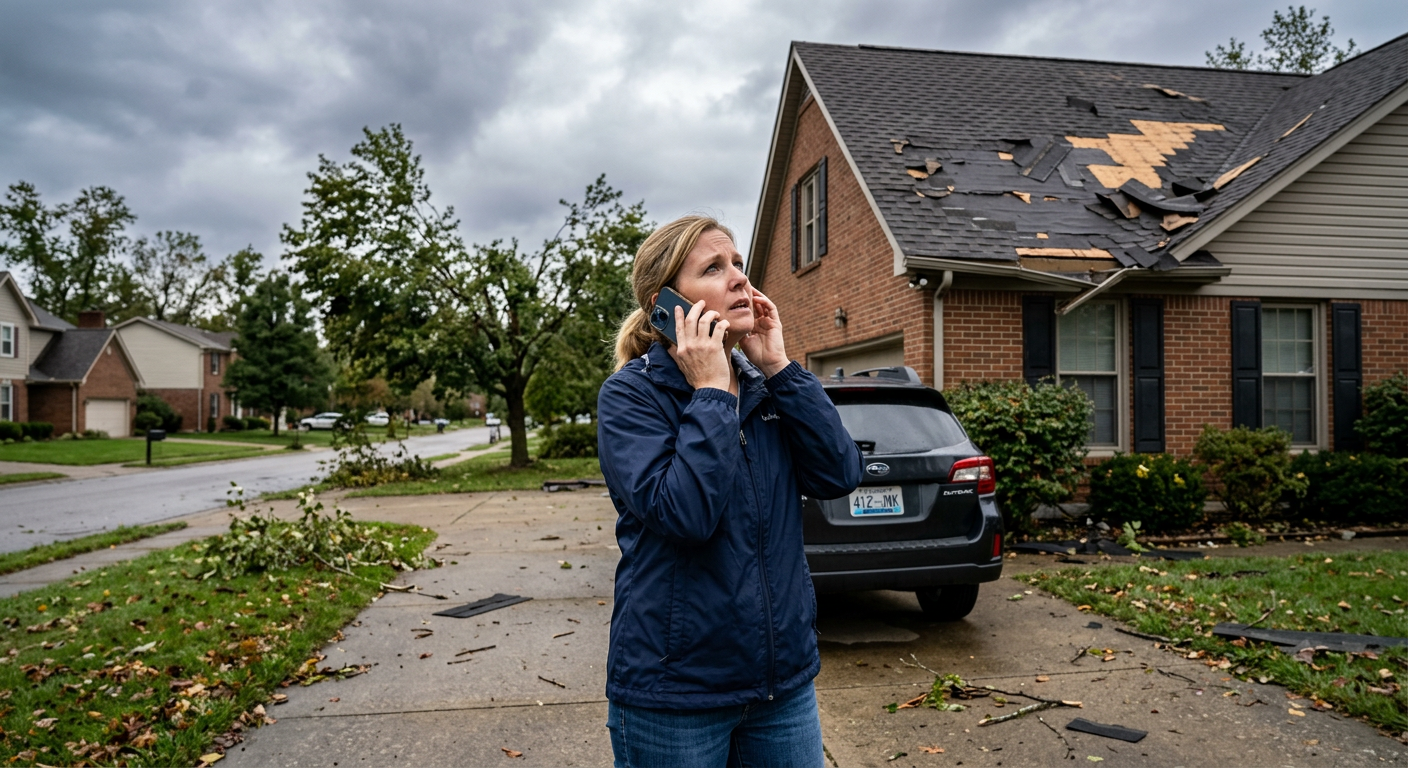
It depends on the cause. Leaks caused by sudden storm damage — hail, high winds, falling trees — are typically covered under the dwelling portion of your homeowners policy. Leaks caused by gradual deterioration or lack of maintenance are usually excluded. If you suspect a recent storm contributed to your leak, document it immediately with photos and contact your insurer before making permanent repairs.
How much does it cost to find and repair a roof leak?
A professional roof inspection runs $150–$400 depending on roof size and complexity. Most leak repairs — a replaced pipe boot, new flashing around a chimney, or a sealed valley — cost $200–$800 when caught early. Wait until there's structural damage or significant mold and you're looking at $2,000–$10,000 or more in combined roof and interior remediation. Find it early. Fix it fast.
If you've worked through this guide and still can't nail down the source — or if you're in the Louisville, KY area and want a professional set of eyes on the problem — Louisville Roofing and Siding has been diagnosing and repairing residential roof leaks throughout Jefferson County and surrounding communities for years. Our team provides thorough leak investigations, detailed written assessments, and honest repair recommendations without upselling work that isn't needed.
Whether it's a straightforward pipe boot replacement or a complex flashing failure around an older chimney, we can identify it, document it, and fix it right the first time. If storm damage is involved, we'll help you navigate the insurance claim process and ensure you get the full scope of repairs covered. Contact us today for a free estimate — no pressure, no upsell, just straight answers about what your roof needs.
Found a Leak? We'll Track It Down and Fix It.
Louisville Roofing & Siding provides free leak assessments throughout Jefferson County and surrounding areas. Call or click — we'll get out fast.